Overview
Guest Sponsor Info setup has three phases:
| Phase | Where | Minimum role required |
|---|---|---|
| 1 — SharePoint | SharePoint Admin Center + landing page site | SharePoint Administrator |
| 2 — Guest Sponsor API | Azure Cloud Shell (recommended) or local PowerShell/shell | Azure Owner, or Azure Contributor + an access-management role (User Access Administrator or Role Based Access Control Administrator), plus Microsoft Entra roles via PIM. Resource-group scope is the normal path; use subscription scope only when this run still needs provider registration or resource-group creation. |
| 3 — Web part | SharePoint landing page (edit mode) | Site Owner |
[!NOTE] The web part includes a built-in Setup Wizard
The first time you add the web part to a page, a Setup Wizard opens automatically. It walks you through choosing between production mode (Guest Sponsor API) and demo mode, shows the deploy command with a copy button, and lets you enter the API credentials at the end. This page is the full reference that the wizard links to — work through Phases 1 and 2 before (or alongside) running the wizard, then complete Phase 3 inside it.
Before you begin
This guide assumes a dedicated SharePoint landing page as the first reliable destination for guest users. If your invitation process or governance tooling supports a custom redirect URL, point it to that page instead of a generic My Apps destination. My Apps is designed for app launch, not for sponsor visibility, and a tenant-scoped Microsoft Teams deep link only helps after the guest has already been added to at least one team in your tenant.
It also helps to align your wording early: the inviter and the sponsor are not always the same person in guest onboarding workflows. Some tools also label the sponsor as the “owner” of the guest relationship. If your landing page, emails, or admin instructions mix those roles, guests may still contact the wrong person.
Read the sponsor vs inviter explanation.
If you do not already have governance and lifecycle management for guest accounts, solve that layer first. This web part is most valuable once guests reliably reach the landing page you prepared and once sponsor assignments stay current over time.
In the default indirect invitation path, you usually do not control where the guest lands after invitation redemption, so they often end up in My Apps instead of on your landing page. To steer guests there reliably, you need a process based on Microsoft Graph invitations or governance tooling built on top of that. EasyLife 365 Collaboration does exactly that. You can build this yourself, but then you also need to recreate the actual governance, sponsor assignment, and lifecycle capabilities around it. In practice, that is usually more expensive than licensing EasyLife.
Workoho, the team behind Guest Sponsor Info, is an EasyLife 365 Platinum Partner.
Book a demo with Workoho to see how EasyLife brings guests to the landing page and keeps governance aligned.
Book a DemoFor Microsoft Graph permissions and runtime data handling, see the Privacy Policy. For Azure deployment attribution and opt-out, see Telemetry. If you need hands-on help instead of a self-service rollout, see Support.
Phase 1 — SharePoint
Decide what the guest should open first
Before you install anything, choose the SharePoint page that should serve as the guest landing page. This is the page you should reference in onboarding emails, governance workflows, and invitation redirects. It should become the first reliable SharePoint destination after invitation redemption.
- Use a dedicated landing page, not a generic collaboration site home page.
- Put the web part high on the page so sponsor, backup sponsor, and contact context are visible immediately.
- Treat Microsoft Teams links as a follow-up step from that page, not as the only first destination.
Decide where the landing page should live
If you are creating a new landing page anyway, also consider whether it should
eventually live at the tenant’s root site (/). Microsoft describes the
SharePoint home site as a major organizational entry point, and in newer
tenants the root site is often still flexible enough to make that decision
early. If you use /, the address is also easier for guests to remember
without an extra shortlink service.
That does not mean your employee portal has to live on the same page. In many organizations, internal employee content already lives elsewhere, and the shared landing page simply links to it. SharePoint audience targeting can also help you show different navigation, news, and web-part content to employees and guests on the same landing page.
Even if the root site is already occupied, this can still be a sensible
long-term direction. You can start with a communication site such as
/sites/entrance, establish it as the shared landing page first, and later use
Microsoft’s supported root-site swap approach to move that experience to /
when the timing is right. If you plan for that, keep the landing page as a
modern communication site and review root-site prerequisites, permissions, and
sharing settings early.
See also:
Install from Microsoft AppSource
[!IMPORTANT] AppSource listing pending review — The web part has been submitted to the Microsoft commercial marketplace and is currently awaiting approval. The installation steps below describe the process once the listing is live. If you need to deploy before approval, use the deployment guide on GitHub for the non-AppSource path.
The web part is available in the Microsoft commercial marketplace (AppSource). Installing from there deploys it tenant-wide via the Tenant App Catalog — no file upload or manual deployment required.
Install via SharePoint Admin Center:
- Open SharePoint Admin Center → More features → Apps → Open.
- Click Get apps from marketplace and search for Guest Sponsor Info.
- Select the app and click Get it now.
The solution uses skipFeatureDeployment: false — the web part does not
become available tenant-wide automatically. After the Tenant App Catalog
installation, a Site Collection Administrator must add the app to the landing
page site explicitly: Site Contents → Add an app → Guest Sponsor Info.
This is intentional and prevents accidental installation on unintended sites.
The web part requests no Microsoft Graph permissions of its own — the API access queue will remain empty. All Graph calls are made server-side by the companion Azure Function using its Managed Identity.
Make the web part accessible to guests
When installed via AppSource or the Tenant App Catalog, the web part JavaScript
bundle is served from the Tenant App Catalog’s ClientSideAssets library.
B2B guest users cannot access this library before authenticating to the host
tenant, which is not guaranteed before the page load. If guests cannot load
the bundle, the web part silently fails to render.
The web part’s built-in Guest Accessibility diagnostics panel (property pane) detects the current scenario and shows the result of each check with a recommendation.
Enable the Office 365 Public CDN.
When the Office 365 Public CDN is enabled, SharePoint replicates web part
bundles to Microsoft’s edge CDN (publiccdn.sharepointonline.com), which is
accessible anonymously — no SharePoint authentication required. This is the
most reliable approach for guest users.
Required role: SharePoint Administrator.
PowerShell prerequisites for the commands below:
- Windows / SharePoint Online Management Shell: install
Microsoft.Online.SharePoint.PowerShellonce. - Prefer
Install-PSResourcefor module installation. On Windows PowerShell 5.1, first update PowerShellGet / PSResourceGet becauseInstall-PSResourceisn’t available out of the box. - PnP path: use PowerShell 7+ even on Windows, install
PnP PowerShell once, and
register your own Entra app
because
Connect-PnPOnline -Interactiverequires a client ID.
Choose one of the following equivalent admin shells:
Windows: SharePoint Online Management Shell
# Install once: Install-PSResource Microsoft.Online.SharePoint.PowerShell -Repository PSGallery -Scope CurrentUser
Connect-SPOService -Url "https://<tenant>-admin.sharepoint.com"
Set-SPOTenantCdnEnabled -CdnType Public -Enable $true

# Verify the ClientSideAssets origin is included (added by default):
Get-SPOTenantCdnOrigins -CdnType Public
# Expected output includes: */CLIENTSIDEASSETS

# If the origin is missing, add it:
Add-SPOTenantCdnOrigin -CdnType Public -OriginUrl "*/CLIENTSIDEASSETS"
Cross-platform: PowerShell 7 with PnP PowerShell (also works on Windows)
# Install once (PowerShell 7+): Install-PSResource PnP.PowerShell -Repository PSGallery -Scope CurrentUser
# Register once: https://pnp.github.io/powershell/articles/registerapplication.html
Connect-PnPOnline -Url "https://<tenant>-admin.sharepoint.com" `
  -ClientId "<your-pnp-app-client-id>" -Interactive
Set-PnPTenantCdnEnabled -CdnType Public -Enable $true

# Verify the ClientSideAssets origin is included (added by default):
Get-PnPTenantCdnOrigin -CdnType Public
# Expected output includes: */CLIENTSIDEASSETS

# If the origin is missing, add it:
Add-PnPTenantCdnOrigin -CdnType Public -OriginUrl "*/CLIENTSIDEASSETS"
[!NOTE] CDN propagation takes up to 15 minutes. Once active, the bundle URL changes to
publiccdn.sharepointonline.comautomatically — no reconfiguration needed.
Verify guest access to the landing page site
Guests need at least Read (Visitor) permission on the landing page site. Rather than a dynamic Entra group — which can take up to 24 hours to reflect new members — use the built-in Everyone group. It covers every authenticated user including B2B guests who have accepted their invitation, and takes effect immediately.
The Everyone group is controlled by the ShowEveryoneClaim tenant setting.
Since March 2018, external users no longer receive the Everyone claim by
default — you must explicitly enable the setting. If Everyone does not
appear in the People Picker, run:
PowerShell prerequisites for the commands below:
- Windows / SharePoint Online Management Shell: install
Microsoft.Online.SharePoint.PowerShellonce. - Prefer
Install-PSResourcefor module installation. On Windows PowerShell 5.1, first update PowerShellGet / PSResourceGet becauseInstall-PSResourceisn’t available out of the box. - PnP path: use PowerShell 7+ even on Windows, install
PnP PowerShell once, and
register your own Entra app
because
Connect-PnPOnline -Interactiverequires a client ID.
Choose one of the following equivalent admin shells:
Windows: SharePoint Online Management Shell
# Install once: Install-PSResource Microsoft.Online.SharePoint.PowerShell -Repository PSGallery -Scope CurrentUser
Set-SPOTenant -ShowEveryoneClaim $true
Cross-platform: PowerShell 7 with PnP PowerShell (also works on Windows)
# Install once (PowerShell 7+): Install-PSResource PnP.PowerShell -Repository PSGallery -Scope CurrentUser
# Register once: https://pnp.github.io/powershell/articles/registerapplication.html
Connect-PnPOnline -Url "https://<tenant>-admin.sharepoint.com" `
  -ClientId "<your-pnp-app-client-id>" -Interactive
Set-PnPTenant -ShowEveryoneClaim $true
Then add Everyone to the site’s Visitors group: Site Settings → People and Groups → [Site] Visitors → New → Add Users → search for Everyone → Share.
[!WARNING] Pitfall — similar-sounding groups:
- Everyone — includes B2B guests ✓
- Everyone except external users — excludes guests ✗
External sharing
SharePoint’s tenant-level sharing setting acts as a ceiling: individual sites cannot be more permissive than the tenant allows.
- Active sites → [landing page site] → Policies → External sharing — set to at least Existing guests only.
If that option is greyed out, raise it under SharePoint Admin Center → Policies → Sharing to at least Existing guests only, then configure the site.
Phase 2 — Guest Sponsor API
The Guest Sponsor API is a companion Azure Function that proxies Microsoft Graph calls for the web part. Guests authenticate against it using EasyAuth, and the function queries Graph using its own Managed Identity — guests never need directory-level permissions in your tenant.
Use install.ps1 as the default entry point. It downloads the infra package,
runs the deployment wizard, creates the Entra App Registration, deploys the
Azure infrastructure, and assigns the required Microsoft Graph permissions —
powered by the
Microsoft Graph Bicep extension.
Run the installer
[!TIP] Azure Cloud Shell is the easiest path for most administrators.
Open Azure Cloud Shell, switch to PowerShell, and run the installer there directly. That means you do not need to prepare anything on your local machine: no local PowerShell installation, no Azure CLI, no
azd, nocurl, and no Homebrew.The deployment wizard detects Azure Cloud Shell automatically, reuses the active Azure sign-in, and can install
azdinto the Cloud Shell home directory when needed.If you want a quick preview of the current first-run experience, see Get started with Azure Cloud Shell.
Recommended default path: Azure Cloud Shell (PowerShell)
- Open Azure Cloud Shell.
- Choose PowerShell.
- Run this command:
& ([scriptblock]::Create((iwr 'https://raw.githubusercontent.com/workoho/spfx-guest-sponsor-info/main/azure-function/infra/install.ps1').Content))
This keeps the full Azure deployment flow inside the browser session. Your local machine stays untouched.
Optional: review the scripts before you run them
If you want to review the scripts before executing anything, inspect the install.ps1 source and the deploy-azure.ps1 source on GitHub first.
install.ps1 is a small bootstrap wrapper: it downloads the current infra
package to a temporary folder, extracts it, forwards your parameters, and then
starts deploy-azure.ps1.
deploy-azure.ps1 is the actual deployment wizard: it collects or accepts the
Azure settings, ensures the required CLIs are available, runs the azd/Bicep
deployment, configures the app registration flow, and prints the values the
web part needs afterwards.
In short: install.ps1 is the recommended entry point for a clean start,
while deploy-azure.ps1 does the real deployment work once the infra package
is available locally.
If you prefer to run locally in PowerShell 7+, use this command:
& ([scriptblock]::Create((iwr 'https://raw.githubusercontent.com/workoho/spfx-guest-sponsor-info/main/azure-function/infra/install.ps1').Content))
On macOS or Linux, you can alternatively start from a plain shell. This installs PowerShell when needed, then runs the same installer:
curl -fsSL https://raw.githubusercontent.com/workoho/spfx-guest-sponsor-info/main/azure-function/infra/install.sh | bash
Azure Developer CLI (azd) is installed automatically if it is not already present. The installer downloads the infra package, walks through selecting a subscription and resource group, runs a pre-provision check, executes the Bicep deployment, and prints the web part configuration values at the end.
During the wizard, choose the Azure subscription, resource group, region, and SharePoint tenant name. Use a subscription in the same Entra tenant as your SharePoint tenant. For the Function App name, leave the field blank unless you need a fixed name; Azure will generate a safe unique name. The defaults are suited for most deployments, and Graph permission assignment can stay enabled when your Entra roles are active.
Installer workflow
Optional: show the installer workflow
- Downloads the infra package and launches the deployment wizard
- Creates the Entra App Registration —
Guest Sponsor Info - SharePoint Web Part Auth(via the Microsoft Graph Bicep extension) - Deploys Azure infrastructure — Function App, Storage Account, App Service Plan
- Assigns Microsoft Graph permissions to the Managed Identity:
User.Read.All,Presence.Read.All(optional),MailboxSettings.Read(optional),TeamMember.Read.All(optional) - Configures EasyAuth on the Function App with the App Registration
- Prints the web part configuration values at the end
Required Azure and Entra roles
| Scope | Required role |
|---|---|
| Subscription (only when this run still needs provider registration or resource-group creation) | Owner for a single-role path, or Contributor + an access-management role (User Access Administrator or Role Based Access Control Administrator) for a split least-privilege path |
| Resource group (normal steady-state path, including first deployment into a pre-created resource group after the providers are already registered) | Owner for a single-role path, or Contributor + an access-management role (User Access Administrator or Role Based Access Control Administrator) |
| Entra ID | Cloud Application Administrator — to create and configure the App Registration |
| Entra ID | Privileged Role Administrator — to assign Graph app roles to the Managed Identity |
[!TIP] The important distinction is not “first deployment” versus “update”, but whether this run still includes subscription-scoped bootstrap actions. If the deployment still needs to register providers or create the resource group, use Azure rights inherited from the subscription: either subscription-scoped Owner alone, or subscription-scoped Contributor + an access-management role (User Access Administrator or Role Based Access Control Administrator). Contributor covers provider registration and optional resource-group creation, while the access-management role covers the storage-account role assignments.
Once the providers are registered and the resource group already exists, the normal path is resource-group-scoped Owner alone or resource-group-scoped Contributor + an access-management role (User Access Administrator or Role Based Access Control Administrator). That narrower scope is sufficient both for routine updates and for a first rollout into a pre-created resource group. Contributor alone isn’t sufficient because the deployment template keeps
Microsoft.Authorization/roleAssignmentsfor the Function App’s Managed Identity in the desired state, and ARM incremental deployments re-evaluate resources that remain in the template. If a later update first enables a previously unregistered provider, that run again needs subscription-scoped Contributor (or Owner) for provider registration.PIM tip: If your organisation uses Privileged Identity Management (PIM), activate the required Entra roles before running the script. The pre-provision hook checks your active directory roles and warns if any are missing.
Global Administrator also satisfies the Entra requirements with a single role. Azure roles still need to be granted separately.
Deployment outputs
At the end, the installer prints:
| Value | Used for |
|---|---|
| Guest Sponsor API Base URL | Web part property pane → Guest Sponsor API Base URL |
| Web Part Client ID | Web part property pane → Guest Sponsor API Client ID |
You can also retrieve them later with azd env get-values.
Phase 3 — Configure the web part
Add the web part to the landing page
After Phases 1 and 2, open the SharePoint landing page in edit mode and add the Guest Sponsor Info web part to the page.
Place it near the top of the page, where guests see it before long text blocks or downstream links. The landing page works best when it first answers the two questions MyApps and Teams usually do not answer on their own: who the guest’s sponsors are, and how they can reach them right now.
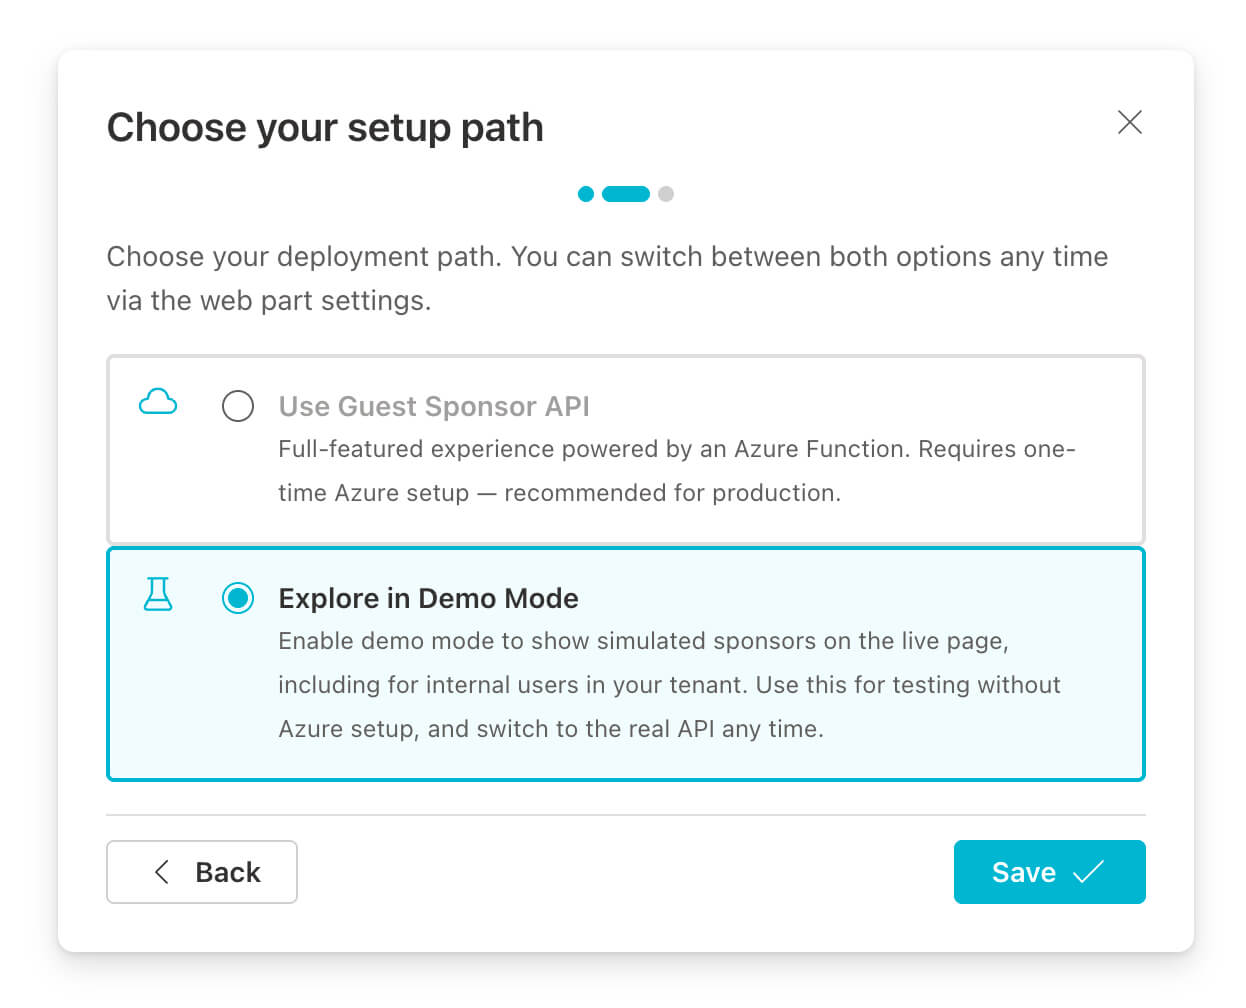
In edit mode, the web part can already render realistic mock sponsors so you can validate placement, spacing, and expanded card content before the Azure side is fully connected. If you enable public demo mode in the property pane, the live page can also show simulated sponsors for regular visitors, including internal users and guests, so the web part can be tested without staying in edit mode or using a guest account.

Connect the web part to the API
If the Setup Wizard is still pending, it opens automatically in edit mode. Otherwise, open the property pane manually (gear icon in edit mode). Then select Guest Sponsor API in the wizard or enter the values directly in the Guest Sponsor API property group:
- Guest Sponsor API Base URL — the Base URL printed at the end of
the
install.ps1run (or fromazd env get-values), e.g.https://guest-sponsor-info-xyz.azurewebsites.net - Guest Sponsor API Client ID — the Web Part Client ID printed at the
end of the
install.ps1run (or fromazd env get-values)
The wizard validates the format of both values before saving. If the wizard no longer opens automatically, fill in the same values in the Guest Sponsor API group of the property pane.
Adjust what guests can see
Beyond the API connection, the property pane includes many more options than this screenshot shows. The visible sections illustrate how admins can tune sponsor eligibility, notifications, display, and contact details, and enable public demo mode on the live page to match the tenant’s data quality and decide how much visitors should see on the landing page.
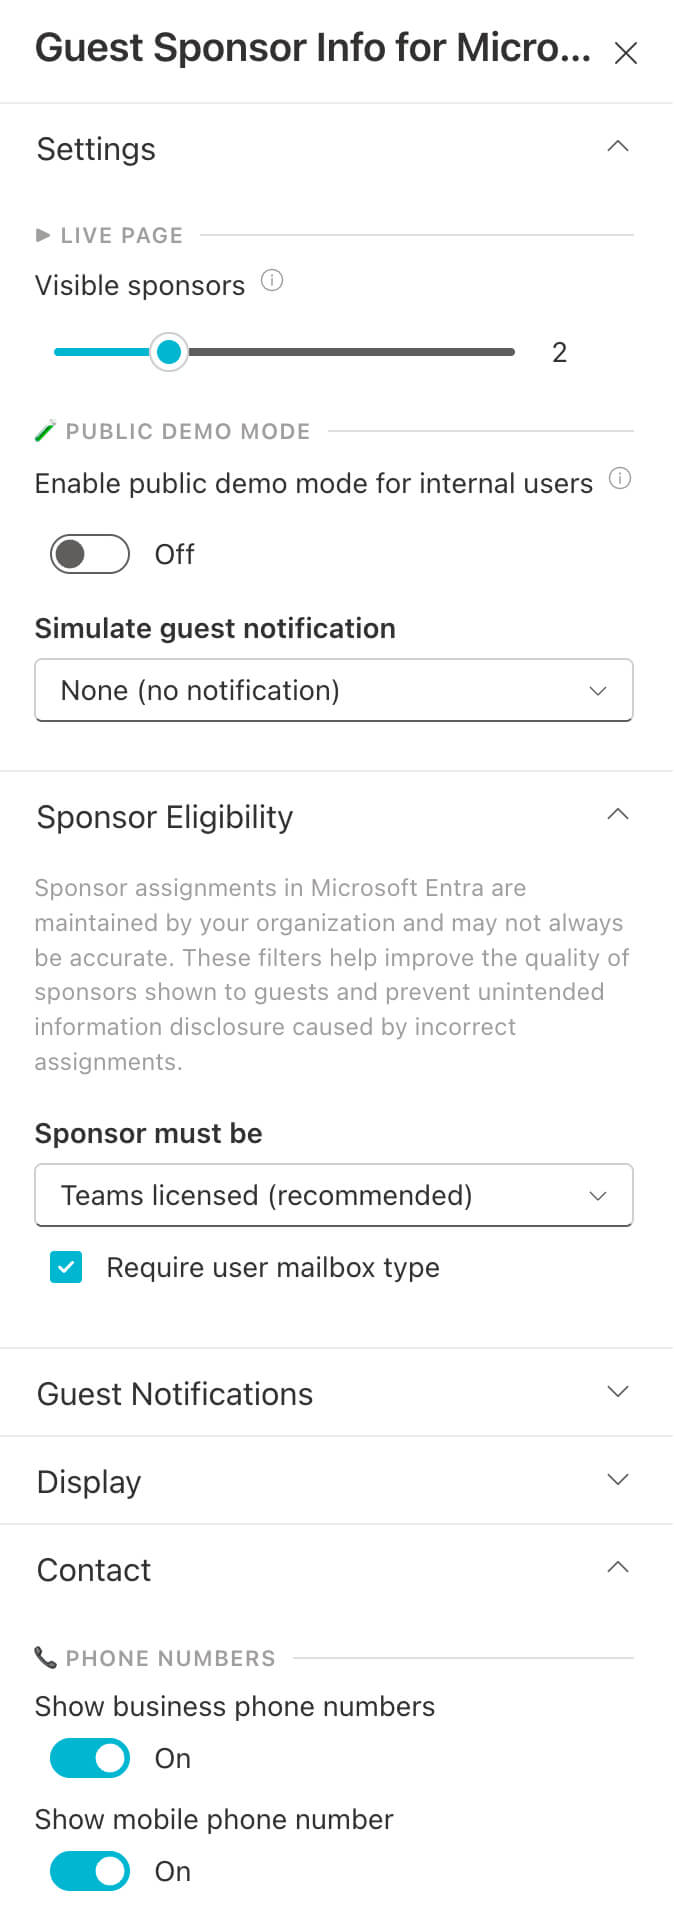
Run the Guest Accessibility check
[!TIP] Guest Accessibility check
After saving, open the property pane and navigate to the Guest Accessibility panel. It runs a series of checks (CDN status, site permissions, external sharing) and shows the result of each with a recommendation. Use this to confirm that the Phase 1 prerequisites are working as expected.
Further reading
For security posture and trust assumptions, see the security assessment on GitHub.
For telemetry and attribution details, see Telemetry.
If something does not work as expected, see the Support page.